
Wedding Details Photography Tips: Mastering Narrative Imagery in 2026
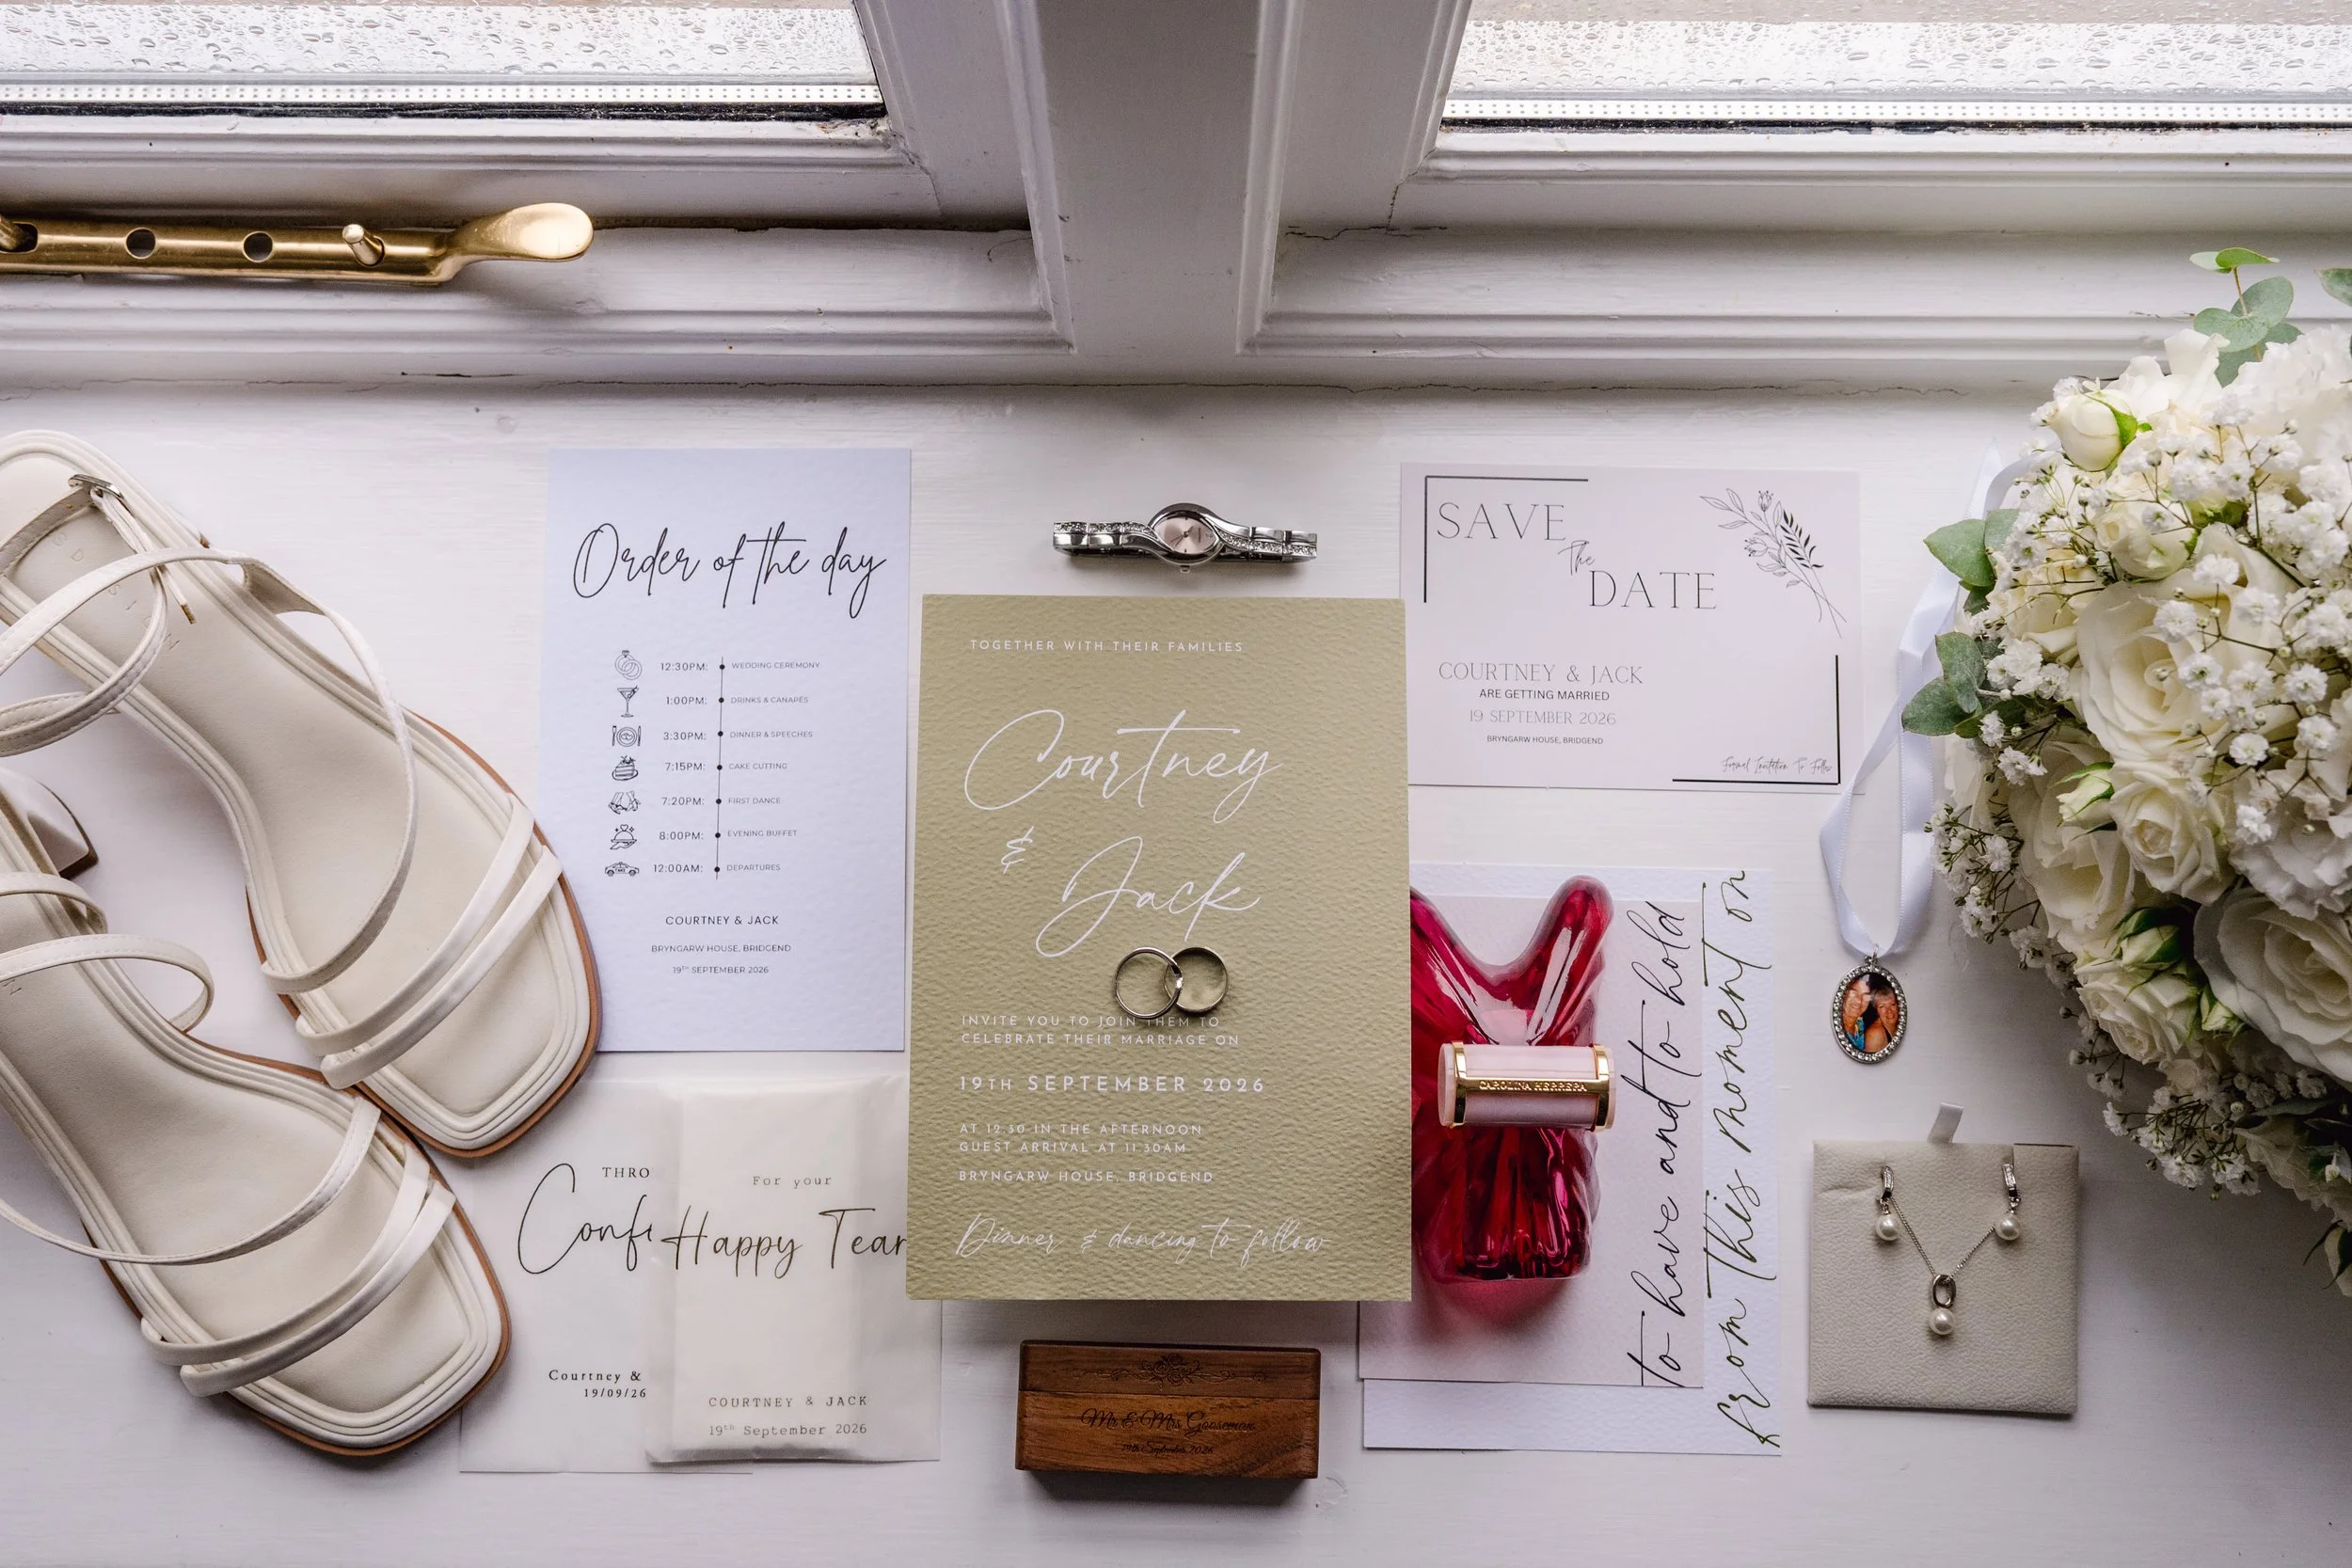
Over 54% of couples now prioritise narrative storytelling over traditional portraiture, yet many photographers still treat detail shots as a secondary obligation rather than a creative cornerstone. You've likely felt the frustration of a cluttered flat lay or struggled with the unforgiving shadows of a dimly lit bridal suite while trying to make a pair of shoes look editorial. It's a common hurdle, but mastering these wedding details photography tips is what separates a standard gallery from a high-end, cohesive brand narrative. We believe that every invitation suite and heirloom piece deserves the same level of intentionality as the couple's first kiss.
This guide provides the professional techniques and compositional theories you need to transform small objects into compelling visual anchors for your portfolio. We'll explore a repeatable workflow for styling stationery and jewellery naturally, alongside advanced lighting methods that ensure every macro shot remains crisp and intentional. By following these structured approaches, you'll develop a signature style that meets the prestigious standards of the IOWP and resonates with the modern, design-conscious couple. We're here to help you refine your craft and build a portfolio that reflects true industry excellence.
Key Takeaways
Understand how detail shots act as the narrative architecture of a gallery, establishing the colour palette and aesthetic tone from the very first frame.
Apply sophisticated compositional theories, such as the strategic use of negative space, to implement these wedding details photography tips for a clean, editorial finish.
Discover the technical requirements for macro work, including the selection of the ideal focal length and the use of soft window light for natural, three-dimensional depth.
Refine your on-the-day efficiency by building a professional styling kit and following a structured workflow for capturing iconic stationery flat lays.
Learn how to strategically integrate detail imagery into your portfolio to improve gallery pacing and enhance your standing for the IOWP Awards.
Table of Contents
The Art of the Detail: Why Narrative Imagery Matters
Detail photography serves as the vital connective tissue of a wedding gallery. With over 54% of couples now preferring narrative storytelling over traditional portraiture, according to the Snapeen Wedding Photo Report (April 2026), these images have become more than mere filler; they preserve the atmosphere, textures, and deliberate design choices that define the event's identity. These images act as a visual bridge, transitioning the viewer from the quiet anticipation of the morning to the energy of the reception. For a professional, mastering these wedding details photography tips is essential for creating a gallery that feels like a curated editorial feature rather than a simple collection of snapshots.
High-end wedding blogs and magazines prioritise detail-heavy submissions because these shots provide the context necessary to tell a complete story. They establish the colour palette and set the scene for the reader. Beyond publication, there's a profound psychological impact on the couple. While they'll remember the feeling of the day, the specific textures of the lace or the artisanal finish of the menu cards can fade. Your role is to anchor those memories through disciplined, narrative imagery that captures the essence of their chosen aesthetic.
Establishing the Visual Theme
The wedding's aesthetic is often first introduced through stationery and florals, and applying specific wedding details photography tips here ensures the visual theme is established early. These elements are the blueprints of the day's visual language. By photographing the invitation suite with precision, you provide a clear reference point for the colour palette and typography that will recur throughout the gallery. Consistency is paramount. The lighting and editing of these early shots must align perfectly with the rest of the day to maintain a sense of order. You can create a distinct sense of place by incorporating localised textures, such as raw silk, tumbled limestone, or hand-painted canvas, which ground the objects in a specific environment.
Details as Storytelling Elements
Moving from simply taking a photo to curating a story requires a shift in perspective. You aren't just documenting an object; you're capturing a milestone. Heirloom items, such as a grandmother’s locket or a vintage pocket watch, add layers of emotional depth that portraits alone cannot always convey. Iconic elements like the dress and the rings serve as visual anchors for the wedding narrative. When you approach these subjects with the intent to curate, you begin to see how they contribute to a professional portfolio. This level of intentionality is exactly what we look for in IOWP Awards submissions, where narrative excellence is a key criterion for success. Through our mentorship programmes, we help you transition from being a photographer who captures events to an artist who curates legacies.
Compositional Principles for Elevating Wedding Details
High-end wedding photography relies on a foundation of disciplined composition. While many focus on the objects themselves, the arrangement within the frame dictates the viewer's emotional response. Applying the Principle of Thirds to small-scale subjects ensures the image feels balanced yet dynamic. By placing the most intricate part of a floral arrangement or the hallmark of a ring on a grid intersection, you create a natural focal point that feels intentional. These foundational wedding details photography tips are what distinguish an amateur flat lay from a professional editorial. When styling jewellery or accessories, the "Rule of Odds" is particularly effective. An odd number of elements, such as three rings or five invitation pieces, creates a more natural and visually interesting cluster than even groupings. This prevents the shot from looking too symmetrical or staged.
Subtle cues like ribbons, floral stems, or the edges of stationery act as leading lines. These direct the viewer's eye toward the primary focal point, such as a diamond or a calligraphed name. Integrating these refined wedding details photography tips into your workflow allows you to move beyond basic documentation. If you're looking to formalise these skills, our Wedding Photography Mentorship Program offers personalised guidance on elevating your compositional standard to an award-winning level.
Mastering Negative Space
In the context of luxury branding, "less is more" remains a guiding principle. Negative space isn't simply empty area; it's a deliberate choice that provides the subject room to breathe and creates a clean, editorial feel. By balancing the frame with significant unoccupied space, you provide practical value for your clients. This layout allows for magazine-style text overlays or elegant album designs without cluttering the visual narrative. It's about finding the equilibrium between the subject and the silence around it. Mastering this balance is key to achieving the sophisticated aesthetic found in high-tier publications and prestigious galleries.
Depth and Dimension
Creating a three-dimensional feel in a two-dimensional shot requires a mastery of layering. You can achieve this by placing delicate textures like lace or silk in the foreground and background, effectively sandwiching the main subject. Utilising a wide aperture creates "bokeh", which softly blurs these layers to isolate intricate details like fine engraving. Depth of field refers to the range of distance within a photograph that appears acceptably sharp, a critical consideration when using macro lenses to isolate intricate textures. This technique ensures the viewer’s attention remains fixed on the most significant elements of the story.
Essential Equipment and Lighting Techniques for Detail Shots
Precision in detail photography requires a deliberate choice of optics and a deep understanding of light behaviour. While a standard 50mm lens provides a versatile, natural field of view for larger items like shoes or bouquets, a 100mm macro lens is indispensable for capturing the intricate hallmarks of a ring or the fine grain of artisanal paper. These specific wedding details photography tips focus on the technical rigour needed to produce high-resolution imagery that stands up to professional scrutiny. Finding the "good light" usually involves seeking out a large window, which offers soft, directional illumination that creates gentle shadows rather than harsh, unflattering highlights.
Managing light is just as important as finding it. A small silver or white reflector can lift deep shadows in a jewellery box, while a handheld diffuser helps manage specular highlights on polished surfaces. While natural light is often preferred for its organic feel, a subtle fill flash can be necessary in dark bridal prep rooms to maintain a low ISO and preserve image quality. The goal isn't to overpower the room's atmosphere but to enhance the existing narrative through controlled exposure and refined technique. This balance is a hallmark of the high standards we promote within our professional community.
Macro Mastery
Understanding the minimum focus distance of your lens is critical when working at close range. If you're just starting your journey, you might find our guide on Choosing Your First Digital SLR for Beginners helpful for selecting the right body to pair with these specialised lenses. To keep focus sharp, use a slightly smaller aperture, such as f/5.6 or f/8, to ensure the entire subject remains within the depth of field. Manual focus is often more reliable than autofocus in macro scenarios, allowing you to pin the focus exactly on the most important detail, such as the prong of a diamond setting or the texture of a silk ribbon.
Lighting for Texture
To reveal the intricate embossing on high-end stationery, position your light source at a low angle to the side of the paper. This side-lighting creates tiny shadows within the texture, making the design stand out in a way that flat, front-on lighting cannot achieve. For reflective surfaces like watches or patent leather shoes, you must be mindful of what is being reflected in the object. Using a white card or a scrim can create clean, even reflections that enhance the item’s luxury appeal. Intentional shadow play can also add a sense of mood and mystery, moving the image away from a clinical product shot toward a piece of narrative art.
A Step-by-Step Workflow for Capturing Iconic Flat Lays
A successful flat lay is rarely the result of chance; it's the outcome of a methodical, repeatable workflow. While the compositional theories discussed earlier provide the necessary framework, the physical execution requires a professional styling kit and a disciplined approach to layering elements. You should begin by establishing a base that complements the wedding's theme. Whether you choose a hand-painted canvas or a neutral linen roll, the background should remain secondary to the objects themselves. By adopting a "Hero Item" approach, you start with the most significant piece, usually the primary invitation, and build the narrative around it. This ensures the most important information remains the visual anchor of the frame.
Integrating these wedding details photography tips into your routine allows you to maintain high standards even when time is limited on a wedding morning. If you're ready to see these techniques in action and refine your process, you can view our upcoming wedding photography training dates in the UK to receive hands-on guidance from our mentors.
The Styling Kit Essentials
A professional styling kit is a fundamental requirement for any serious wedding photographer. Carrying acrylic styling blocks and adhesive putty allows you to create depth by subtly raising items off the background, while vintage stamps and wax seals add a layer of historical character to the scene. You should ensure your collection of silk ribbons is colour-coordinated to match common wedding palettes, allowing you to bridge the gap between the stationery and the floral elements effortlessly.
Refining the Frame
Once your kit is prepared, follow this four-step process to build a cohesive and balanced image:
Step 1: Place your largest items first, typically the invitation suite. Use styling blocks to create height and separation from the base material.
Step 2: Layer smaller, high-value items like the rings and jewellery on top or nearby. These should relate to the "Hero Item" without obscuring critical text or dates.
Step 3: Soften the edges of the composition with loose florals or organic textures. This step integrates the flat lay with the wider floral aesthetic of the day.
Step 4: Check the frame for balance and distracting "tangents" where items barely touch. Adjust the spacing to ensure the viewer's eye moves smoothly through the entire arrangement.
Integrating Details into a Professional Portfolio
Mastering the technical execution of a flat lay is only the first step. The final stage of progression involves understanding how these images serve your commercial standing and professional reputation. High-end clients often invest significant resources into bespoke stationery, florals, and curated accessories; they expect their photographer to treat these elements with the same intentionality as the portraiture. By applying consistent wedding details photography tips, you demonstrate a level of care that resonates with a discerning, design-conscious clientele. These images act as essential transitions in your digital galleries and physical albums, providing the "breathing room" necessary to break up the pace of high-emotion moments and establish a cohesive brand aesthetic.
Professional recognition often hinges on the ability to deliver a complete narrative. Detail shots that showcase a mastery of light and composition significantly improve your chances of success in industry competitions. They prove you possess the discipline to find beauty in the small, often overlooked components of a wedding day. If you're looking to refine your signature style, receiving professional critique is an invaluable part of the journey. It allows you to identify subtle weaknesses in your styling or lighting that might otherwise go unnoticed, ensuring your work consistently meets the highest industry standards.
The Path to Professional Excellence
While self-study is a valid starting point, true mastery often requires a more structured environment. Our photography courses and workshops provide a controlled setting where you can practise these skills under the guidance of experienced mentors. These intensive sessions allow you to experiment with different textures and lighting setups without the time pressure of a live wedding day. Mentorship plays a critical role here, as it provides a direct line to expert feedback. A mentor can help you understand why a particular arrangement feels cluttered or how a slight shift in a reflector could have transformed a jewellery shot from standard to editorial.
Aiming for Recognition
As you build a body of work that reflects these high standards, you should begin preparing your best imagery for formal validation. Detail shots are frequently chosen as "hero" images for professional websites because they instantly communicate a photographer's aesthetic and attention to detail. This level of curation is a key requirement for the IOWP Awards, where narrative excellence and technical precision are celebrated. We invite you to join the Institute of Wedding Photographers, where everyone is welcome to sign up and start learning. By joining our community, you gain access to the support and resources needed to bridge the gap between artistic passion and a successful, commercially viable career.
Defining Your Professional Aesthetic
Detail photography represents the final, sophisticated layer of a wedding gallery, providing the visual depth necessary to tell a complete story. By refining your approach with these wedding details photography tips, you move beyond the mechanical act of documentation and enter the realm of editorial curation. We've examined how disciplined composition and intentional lighting transform simple objects into narrative anchors that define your brand’s prestige. These techniques ensure that every element of the wedding day, from the delicate grain of the stationery to the facets of a diamond, is captured with the gravitas it deserves.
Reaching this level of mastery is a deliberate process that benefits from structured guidance and high-standard peer review. The Institute of Wedding Photographers provides a supportive environment where you can develop these skills alongside industry leaders who value excellence and discipline. Whether through our intensive workshops or personalised mentorship, we help you bridge the gap between creative passion and commercial success. Ready to elevate your craft? Sign up for our Professional Wedding Photography Workshops today. We look forward to seeing your work reach new heights within our professional guild.
Frequently Asked Questions
What should be included in a wedding photography styling kit?
Essentials include styling blocks, adhesive putty, silk ribbons, vintage stamps, and wax seals. It's also helpful to carry a small reflector and a clean styling mat or linen roll. These items allow you to elevate the presentation of stationery and jewellery. Having these tools ready ensures you can maintain high standards regardless of the venue's limitations. This kit acts as your mobile studio for creating consistent, high-end imagery.
How do I photograph wedding rings without distracting reflections?
Use a handheld diffuser or a piece of white card to create a clean, even light source that masks distracting room reflections. You should also consider your own reflection in the polished metal; wearing dark clothing can help minimise this. Positioning the ring slightly away from direct light sources often helps. This technical precision is a key part of the wedding details photography tips we teach in our advanced workshops.
Do I really need a macro lens for wedding details?
While a 50mm or 85mm lens can capture many details, a 100mm macro lens is essential for high-end work like ring close-ups or intricate dress textures. It allows for a 1:1 magnification that standard lenses cannot achieve. This level of detail is often required for IOWP Award submissions. If you don't own one, you can hire a macro lens for specific commissions to ensure your portfolio remains competitive and professional.
How much time should I allocate for detail shots on a wedding day?
You should aim to spend approximately 30 to 45 minutes on detail shots during the morning preparations. This window allows you to style the invitation suite, photograph the rings, and capture the florals without rushing. Building this time into the couple's itinerary ensures you have the mental space for creative composition. If the schedule is tight, prioritise the "hero" items that define the day's aesthetic and establish the visual colour palette.
What are the best backgrounds for wedding flat lays?
Neutral, textured surfaces like hand-painted canvas, raw silk, or tumbled limestone are excellent choices for modern flat lays. These materials provide depth without distracting from the primary subjects. You should avoid overly busy patterns that clash with the stationery design. Carrying a few lightweight styling boards in your kit ensures you always have a clean, professional base that aligns with your brand's narrative and meets the high standards of a professional guild.
How do I style wedding stationery if the couple hasn't provided extra sets?
Use the set they have provided but handle it with extreme care using styling gloves or clean hands. You can create a sense of depth by using styling blocks to raise the main invitation above the RSVP cards or envelopes. If the envelopes are already addressed, you can use ribbons or florals to tastefully obscure the personal details. This resourceful approach allows you to implement wedding details photography tips even when resources are limited.
Can I use a phone for wedding detail shots for social media?
You can use a phone for behind-the-scenes content or quick social media teasers, but your professional portfolio should always feature high-resolution images from your DSLR or mirrorless camera. The sensor size and depth of field provided by professional equipment are necessary for the editorial quality expected in the industry. Using your main camera ensures that the techniques you've implemented are captured with maximum clarity, colour accuracy, and the technical rigour required for certification.
How do I find the best light for bridal prep details in a small room?
Seek out the largest window in the room and turn off all artificial overhead lights to avoid mixed colour temperatures. Position your styling board at a 45-degree angle to the window to create soft, directional shadows that reveal the texture of the items. If the room is particularly dark, use a reflector to bounce light back into the shadows. This disciplined approach to lighting is vital for small-scale subjects and creates a soft, natural aesthetic.